The Basics 3: Polygon editing
Introduction
In the "Basics 3" lesson, we will focus on these objectives:
- Create a polygon layer
- Make a new project folder for autosave
- Clicking polygons into the map
- Edit a polygon to make it bigger
- Avoiding a mistake
- Deleting polygon nodes
There are three rules of editing polygons.
In order to edit a polygon:
- The polygon layer must be the active layer.
- You have to be in edit mode.
- You must select the polygon with the "pencil cursor".
Also, the "Good Naming Rule" applies twice.
Always give your polygon layer a descriptive category name.
Give each polygon a descriptive area name.
Creating and editing Polygons in Scan/US version 8
Begin by creating a layer
It is easy to create and edit polygon-shaped areas in Scan/US.
Like all other Scan/US map objects, editable polygons are organized into LAYERS. So, first you must create your layer (it won't have anything in it until you draw a polygon on the map). The new layer will hold your polygon objects. Then draw your polygon areas.
While drawing (or, rather, clicking) you will be in polygon edit mode. When you return to make changes, remember these steps: first make the polygon layer the active layer. Second, you must again enter polygon edit mode. Third, select the polygon and edit it.
That's the background. We will cover all these steps.
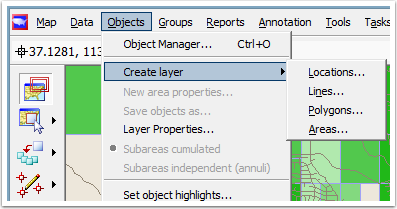
First, as shown above from the Objects menu, choose "Create layer --> Polygons...". This creates the layer, and you have an opportunity to name the layer, as shown below:
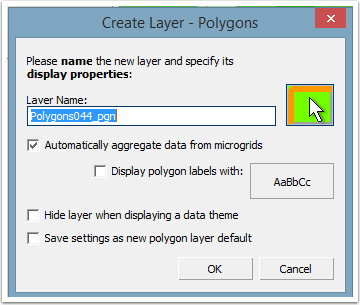
Name the layer something besides "Polygons044_pgn"
When you create the layer, resist the temptation to click "OK" without renaming the layer.
Since you can put more than one polygon into a layer, give your new layer a good name for a collection of objects. A layer is a category, rather than just one object, so give it a category name.
The green button above (white arrow) gives options to change the new layer color. You can change the label appearance, too. Since these have alreade been covered in a previous lesson, we will just move forward with our discussion of object creation and editing.
Since we are drawing these trade areas in St. George Utah, we can call the layer St. George Trade Areas.
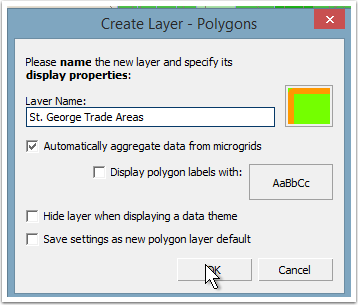
Give the layer a good name, and click 'Ok'
After naming your Polygon layer, which is the name that will show up in the "Layers in Map" dialog, click OK.
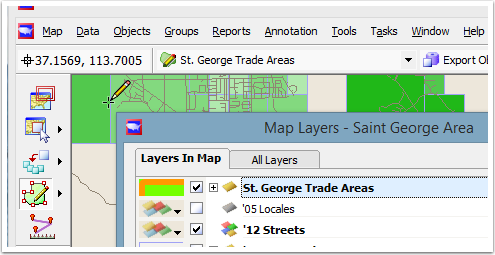
Note the three 'pencils' in the screen above
Now notice three things of interest in the screen shown above, each marked with a pencil icon:
- Up top, the active layer is shown as "St. George Trade Areas". It is shown to be an editable layer by the tiny pencil on top of a green polygon.
- At left, the current mode is "Edit Polygons": a tiny pencil inside a green polygon with editable nodes.
- In the map, the cursor has changed to a tiny pencil with a "plus" cursor at the tip of the pencil. Wherever you click the pencil in the map, you will add another point to your polygon.
Also, you can see that "Layers in Map" has "St. George Trade Areas" highlighted as the active layer.
The map itself has not yet changed.
Now you will click the polygon into the map, by clicking one point after another
Click in the map to make the first point
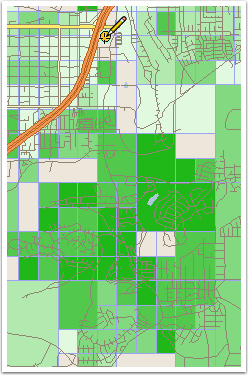
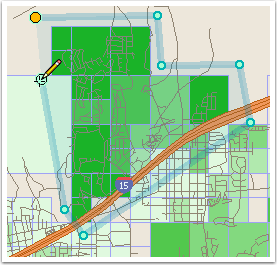
You are going to click a polygon into the map, going around the deep green area in the map. This is an area where the median household income is higher than surrounding areas.
If you decide to move the points later, fine; you will not be able to move them now. Just click one after the other.
Keep on clicking
The polygon will grow, and partially shade in while you are drawing it. Avoid double-clicking until you are ready to be done. If you double-click too early, it will finish your polygon and it will not be large enough.
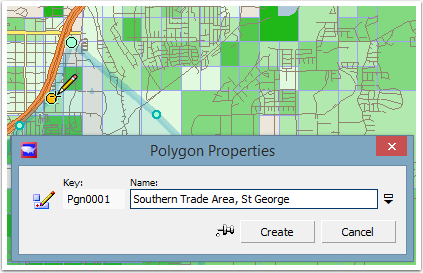
When you close the polygon, give it a good name
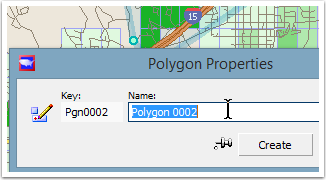
When you get near the end, "double-click", and it will finish your polygon, connecting the last line to the beginning point. It will also pop up a dialog "Polygon Properties", that wil say something like "Pgn0001" for the name.
You should re-name the polygon something that will make sense as a name when it appears in the map over the polygon.
Each object has a "key" and a "name". The name is what appears in the map, and the key is a non-repeating number sequence used internally, by the software, to keep track of objects. About two times out of a thousand, someone might may need to change the key, but chances are that you will never need to do so. But if you did, you would click the pencil button to the left of "Pgn0001" underneath "Key:", and that is where you would do it.
The name, however, you should always change. Then press "create".
Autosave! One more thing to name!
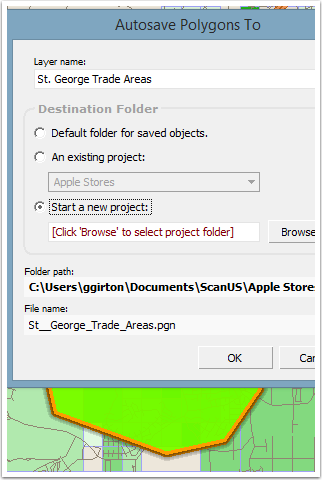
Now that you have created the object on its new layer (and you can see the bright green with orange border polygon sticking out from beneath the dialog above, the "Autosave Polygons" dialog pops up.
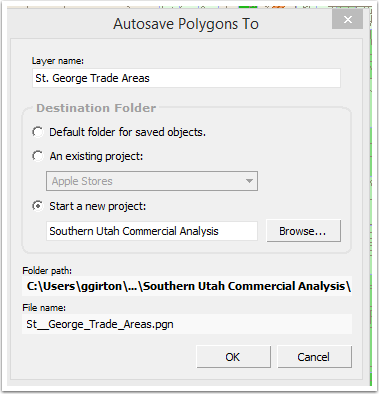
The Autosave Polygons dialog shows three options: Default folder, Existing Project, and "Start a new project".
To highlight how Project Folders work, in this example we will start a new project. Do NOT try to type anything into where it says "Click Browse to select project folder." Instead, please click Browse.
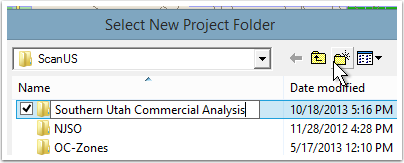
Click the 'new folder' button and name your folder
After clicking the 'browse' button, you have an opportunity to make a new folder. Click the folder icon button with a tiny starburst on it (white arrow above) to create a new folder. Give the new folder a helpful name you will recognize later, such as "Southern Utah Commercial Analysis," as above.
This is it. Click OK.
Now you can see from the readouts the layer name, the project name, its folder page on your drive, and the name of the file where the shape of the polygon is stored.
Before you press OK, it is worth reflecting on what "Autosave Polygons" means.
It means when you create a new polygon, or edit it later, it is saved in a file. If you need to re-start Scan/US, you don't have to worry about losing your polygon edits. They have been "Autosaved".
Go ahead and press OK.
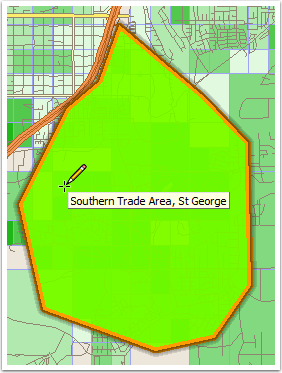
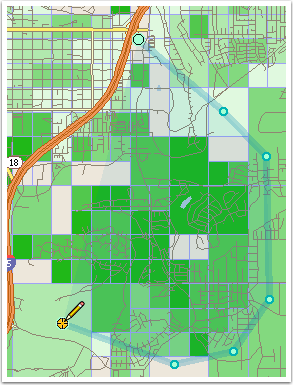
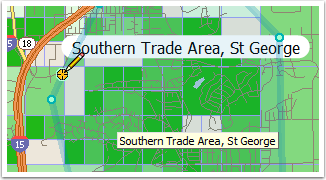
Pointy-headed-polygon
There's your pointy-headed polygon! When you fly the pencil over a polygon in the layer, a yellow "tool-tip" shows the name you have given it.
The pencil-cursor indicates you can click another polygon into the map. However, you won't be able to click in a polygon that overlaps this one.
If do have a need for overlapping polygons, you can temporarily "disappear" a polygon and create another one as if it were not there. Then, when you are done with the second one, you can bring back the first one, and both will show up on the map. The need to do this is rare, so we won't cover it here, but you should know that it IS possible.
Let's make a another trade area to the north.
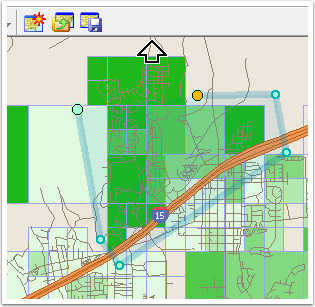
You can use the scroll arrow during polygon edits
Click click click click.... oops! What if you want to draw off the edge of the map? Put your cursor up near the edge, and the "map scrolling arrow" appears. Click that to scroll the map a little bit up, and keep drawing.
Double-click the last point to finish
When you get near the end, double-click to complete the polygon.
A default name is always supplied. Type in a new one.
When the suggested name comes up (Polygon 0002), replace it with a name which will look better as a map label.
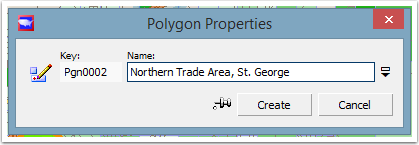
Northern Trade Area. Press 'Create'.
PRESS CREATE. If you choose Cancel, the polygon will disappear, and will not be saved.
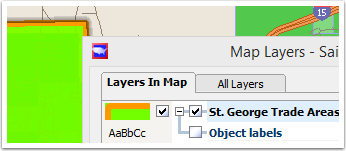
Map Layers dialog, showing label checkbox
Now that you have a polygon in the map, you can cause the label to appear. Press the "+" button next to your layer to expand your options in "Layers in map", and notice the checkbox next to Object labels. You may check it.
The AaBbCc button can be pressed to bring up a "Font and label style" selector box, which is fairly self explanatory, and not covered here.
What happens if you get started on a third polygon somewhere in the map, but change your mind? You can right-click to cancel a "false start".
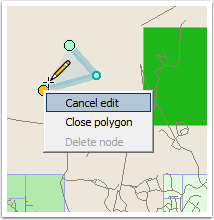
Right-click for the 3-item context menu
The context menu presents three choices here.
Choose "cancel edit" after your RIGHT-click and your polygon will disappear. Your edit has been canceled.
Choose "close polygon" if you are done,to close the polygon WITHOUT double-clicking.
NOTICE the "Delete Node", greyed out at the bottom. You will use this when editing a previously-created polygon. Let's go back and edit our first polygon now.
Here are the changes we'll make: first we will extend the trade are to the left (west), then lop off the pointed top. Also, we will accidentally cancel our edit. Oops! (Don't follow too closely, otherwise you'll make the same mistake we made).

Completed polygon. Now, let's edit it.
Let's expand the southern trade area in St George to the west of the I-15 freeway on the left. There are some high-income households over there we want to include.
Select the polygon layer for editing
Here is the edit polygons overview: once your polygon is A) selected in B) edit mode, it will be easy to add points, delete points, and move points around.
Let's assume you some don't have your editable polygon layer as the Active Layer, and instead (as shown above) have Microgrids as the active layer. Here's how to get back onto that layer.
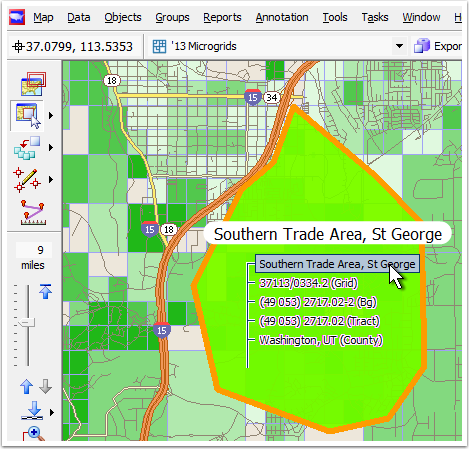
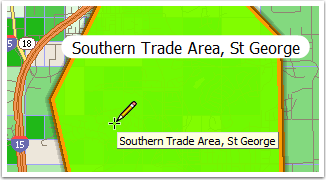
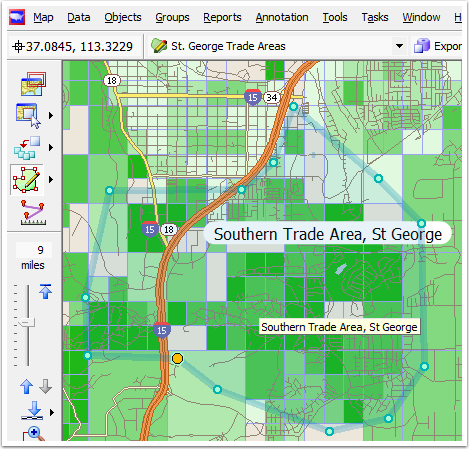
First, choose SELECT OBJECT MODE (button with little white arrow above at left) and click inside the polygon you want to edit, where an in-map menu will appear (white arrow pointing to grey rectangle that says "Southern Trade Area, St. George", middle right above).
Click the name of the polygon you wish to edit, in the little in-map menu (the grey-highlighted text above in the map).
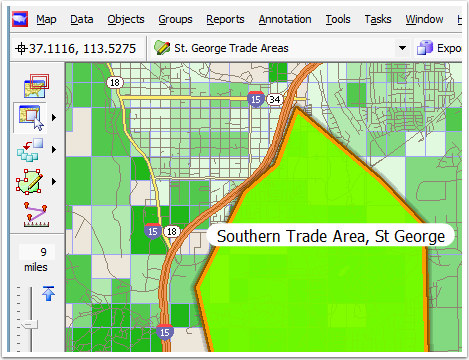
Polygon is selected, active layer has changed
NOTICE two things. A) the current layer dropdown at the top has changed to the name of your layer, "St George Trade Areas", and B) the polygon is highlighted in the map, by a light shadow around the edge.
Because we are already on an editable polygon layer, when we take the next step (clicking the edit polygons mode), Scan/US will NOT give us an option to create a new layer. We already have the layer we want!
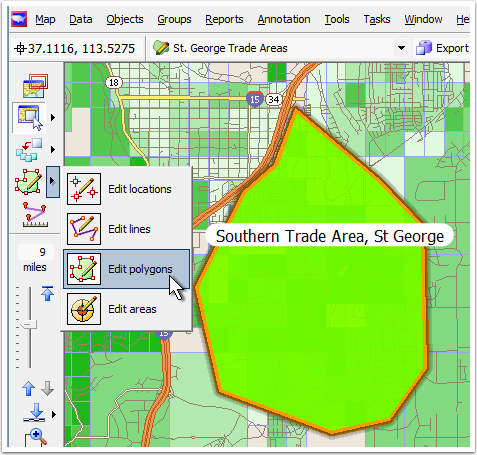
NOW choose 'Edit Polygons' mode
The next step is to choose the Edit Polygons submode. When you do this, the cursor turns into the pencil. When you fly over an existing polygon, it shows the name of that polygon. Clicking within the polygon will select it for editing. Clicking OUTSIDE the polygon will start a new polygon on the layer.
Ready to click, select polygon for editing
Now that the polygon mode is active, click INSIDE the existing polygon.
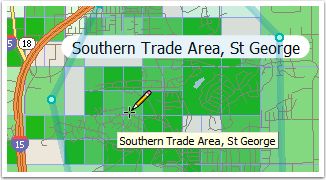
Editable 'nodes' appear on polygon
You can see by the node targets at each vertex that the polygon is ready for editing. Each node is a "click target" and if you click on the node you can drag it around. You may recall from then you were clicking the polygon into the map originally, that the appearance is the same.
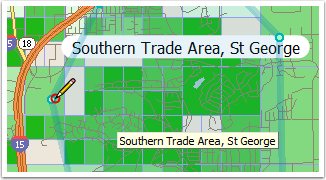
Red circle: about to select a node
There are two different little red symbols that can show up at the end of the pencil. The first is a red circle showing that you are about to select a node.
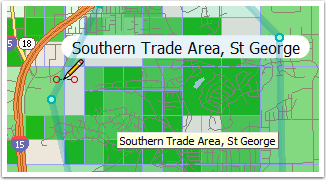
Red bar-bells: about to create a node
The other symbol (above) is two empty red circles on either side of the line, saying "here is where to CUT the line and insert a NEW NODE".
A third symbol is the "selected node". The selected node is colored yellow. This occurs either when you cut (creating a new node) or select (selecting an existing node)
Dragging selected node
By adding nodes (if necessary) and dragging existing nodes to new places on the map, you can alter the shape of a polygon (next picture)
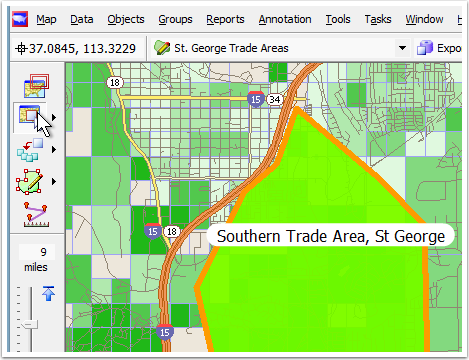
Polygon after editing
Now, you can see the Westward-Ho extension of the southern trade area in the map above, encompassing the high-income areas to the west.
When you click the select mode button again (or any other mode besides editable polygons), it signals you are done with your editing, and the polygon returns to its normal color. It's true that this happens, but ...
Click another mode button: OOPS!
OH NO! My changes disappeared!
Selecting another mode indicates you are done, and that you want to CANCEL. What you must do is AVOID clicking select mode or any other button. Instead, RIGHT_click within the polygon, and choose "Close polygon".
After re-creating our polygon, we right click to get the context menu, below:
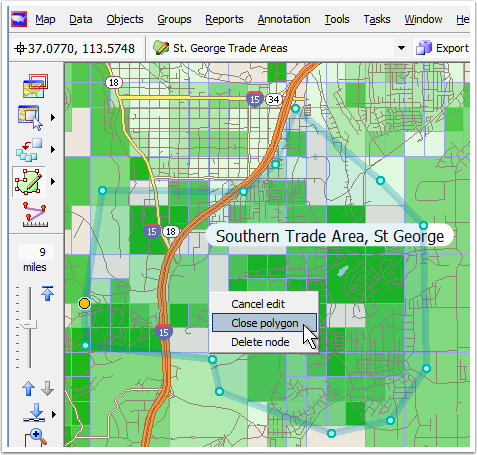
Right-click to get menu to close polygon
In other words, when you have moved your nodes around, right-click to get the context menu, and then choose "Close polygon".
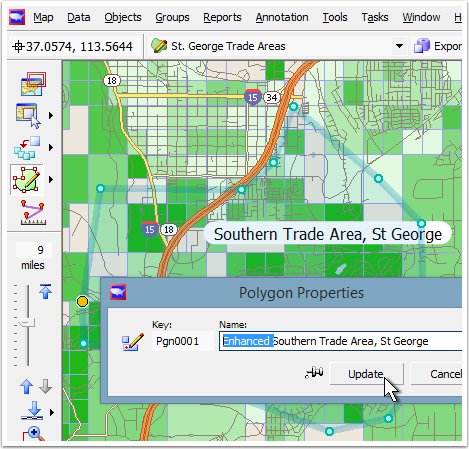
You can rename after an edit
When you close the polygon, the Polygon Properties dialog appears, and gives you an opportunity to modify the name.
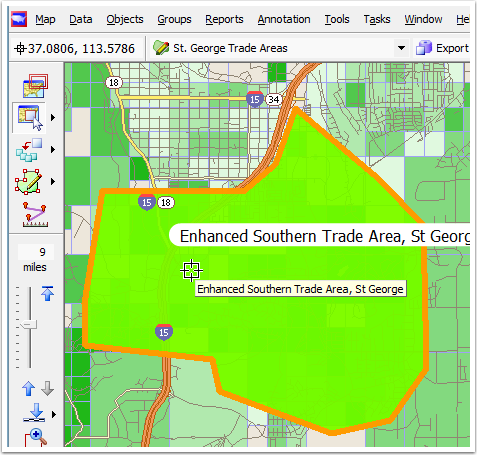
Done with the edit
Now, when you fly your mouse over the polygon, it will show the changed name.
That takes care of adding nodes. Now let's delete a node:
Select the polygon, change to edit polygons mode, with your edit pencil showing, select it again into editable mode to get the blue-dot nodes. (Refer back to earlier in this page if you don't know how to do this: it's covered twice). Now click on the undesired node to get it highlighted solid orange.

With node selected, right click
Then, right-click to get the "delete node" context menu. Choose "Delete node". It will be deleted. Right click again, and choose "close polygon" to be done editing.
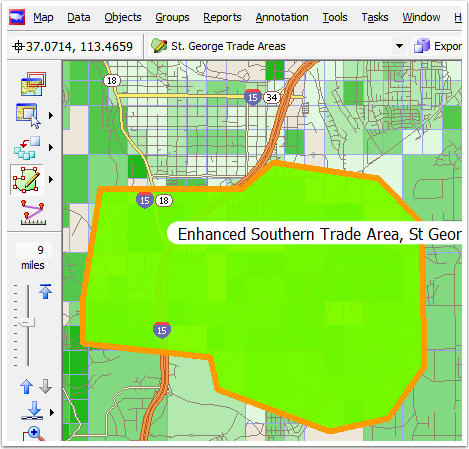
Finished polygon product
Here is your new expanded-to-the-west polygon. Good work!
That's the end of the polygon-editing session. If you have been following along on your own polygons, you can use Quicklook on the Scan/US Data menu to look at the demographic data for the polygons on the layer you have created.
Have fun!