The Basics 5: Group by Object and Classify
Introduction
In this lesson, you will make a thematic (area-fill) map of Microgrids, showing only the grids that fall within a trade area polygon which you have (previously) drawn. This is the type of map you can make by following the steps in this lesson:
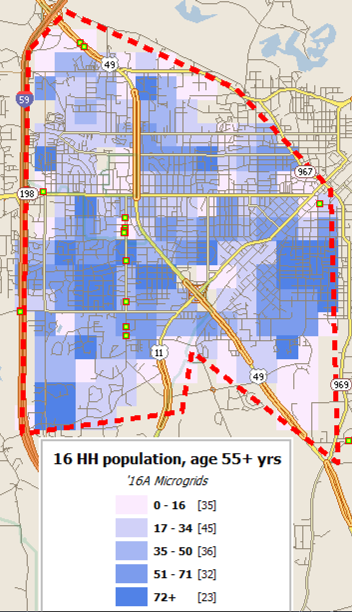
Example completed map
Requirement: Before you begin this workflow, you need to have drawn your trade area polygon (as shown in the steps of the Basics 3 lesson.)
Workflow overview
Starting with an existing polygon, this is the workflow:
- Using "Group by object" on the Groups menu, create a group of Microgrids that are inside the polygon.
- Using "Classify by Value" on the data menu, classify the grids in this group into several ranges.
- These new value-based ranges are themselves groups in an entirely new grouping of grids.
The three rules of group by object:
- The polygon you drew is the Overlay layer. It is like a "cookie cutter" that "overlays" the grid layer.
- The grids are the Target layer.
- When you name a new group, give it a name you will understand and recognize. You will need to check-mark this group later, when you choose "Objects in checked groups".
The easy way to create a target-area thematic map
Here is your overview of the workflow steps:
Activate the polygon trade area layer.
Create a named group of grids, using "Group by object..." (Groups menu)
Give that group a good name!
Now make Microgrids the active layer, and do "Classify by Value.." (Data Menu)
(Specify "Objects in checked groups" in the right-hand-column)
This is the time to remember that good name. Check the named group.
Pick your variable, use Strata Manager, and then click "Assign".
Steps in detail, with illustrations
Show the grids in the map
Choose Map Layers.. from the Scan/US Map menu, and make sure the Microgrid layer is checked in "Layers in Map", so that grids appear in the map.
Activate your polygon layer
Then, also in the Map Layers dialog, double-click your trade area layer to make it active. The reason for this activation is that when you start "Group by Object" the overlay layer will be set correctly, to your polygon layer. This is also true when you are starting with a rings layer, or a drivetime layer.
Notice the name of your polygon, "Enhanced Southern Trade Area, St. George". When you get to it, you will give your group the same name.
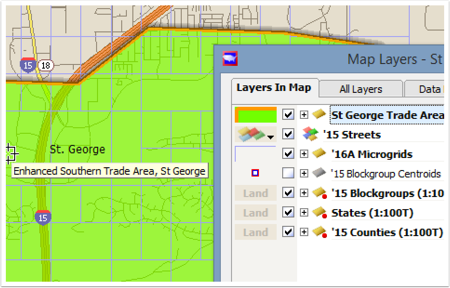
Begin by showing Microgrids (checked) and activate your layer (blue)
Group by Object
Choose Group by Object: your trade area layer should be highlighted.
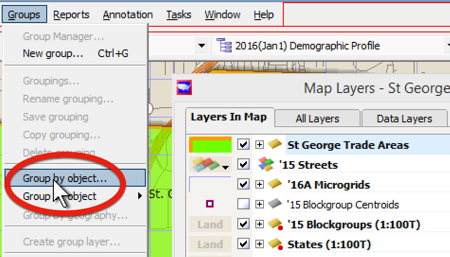
Choose Group by Object from the Groups menu
Specify overlay objects
The first page of the "Group by Object" dialog, "Specify overlay objects," appears.
As with all Scan/US dialogs, a short description summarizes the step. The container objects (in this case there is just 1) in the "overlay" is the "cookie cutter" shape, from one layer (in this case your trade area polygon), that you will "press down" into the other layer (grids) which you will specify on the NEXT box.
There are various way of choosing the container objects in the overlay layer. If you have only one trade area object in your layer, all of these options (in this example instance) will produce the same result: Total overlay objects equal to 1.
Keep in mind that in a different circumstance you might have more objects on your overlay layer. The two columns of radio buttons "choose from active layer," and "choose from layer roster" give you various ways to choose your overlay objects.
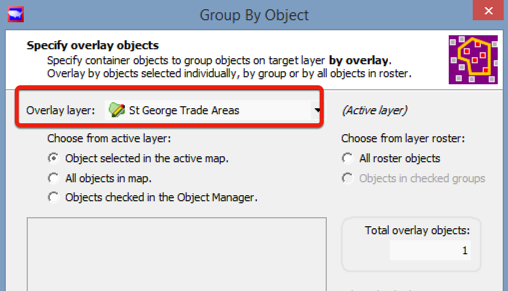
Your polygon is your overlay layer
Notice that the overlay layer is St George Trade Areas. You should recognize the name of your own layer in this step. Click "Next."
Specify target layer and groups
In this step, "Specify target layer and groups," you will choose the grid layer, and name the group that you are going to create on it. Notice the second sentence of the guide paragraph: "Group assignments can be viewed when the target layer is loaded. You have already made sure the MicroGrids are loaded in an earlier step, so you will see the results of your action as soon as you click "Assign".
The target layer is the current-year Microgrids, shown highlighted below next to the white mouse-arrow.
In the next panel, notice the number of total overlay objects (1). If the number here is something like 23,948, this is an indication you do not have the right Overlay layer!
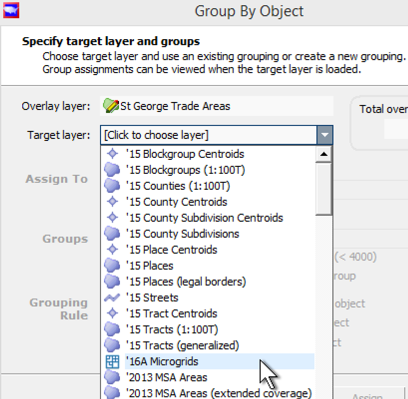
Microgrids is your target layer
Name the group and grouping
Before you leave this page, name the new group and grouping. A good convention is to give the grouping the name of your Overlay layer, and to name the group the name of your trade area object.
Later on, in the "classify by value" step (after you choose the radio button "objects in checked groups") you will need to specify the group by name. Instead of accepting the default name "Grouping024" or "Grouping025", if you give it a more descriptive name you will even be able to understand what it was when you see it again tomorrow.
Shown below, St. George Trade Areas is the name of the grouping, and "Enhanced Southern Trade Area, St George" is the name of the group. Click assign.
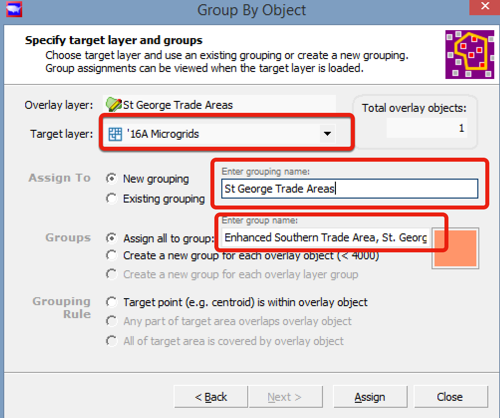
Name your group and grouping, and click 'Assign'
Assign, Autosave, and notice the number of grids
After you click "Assign", an "Autosave Grouping" box will offer you the opportunity to save the grouping. You can click OK, or take advantage of some of the project management options.
Also, notice that there should be a realistic number of Microgrids for your trade area, shown in the legend (double-ended red arrow below). Here, the number is 108, which is the number of grids which fall inside this particular polygon. Make a mental note of this number, it will help you recognize you are at the right place later on in "Classify by Value", when you choose "objects in checked groups" it will show the number of objects in your group.
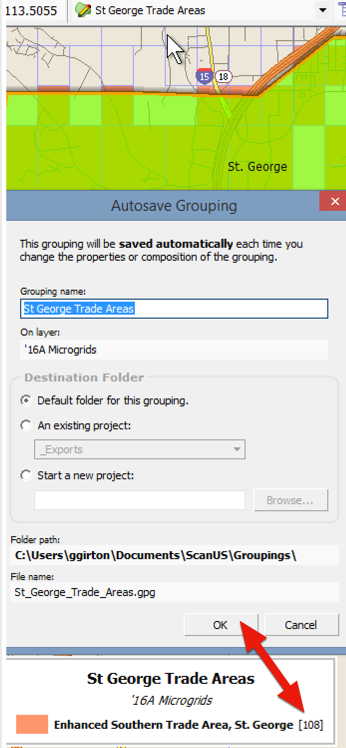
Notice the number of grids in your grouping legend
Pre-adjusting the appearance of the map
In order to see your grids better, you may want to clear the "fill" of the polygon layer, leaving only its outer border.
In "Map Layers," click the button to the left of the polygon layer (red arrow below) to bring up the "Area Style" selector, and un-check "fill" on the "Color Fill" tab (double-ended red arrow below). Also, you may wish to go to the "Border" tab and make the border a more visible color, given how your map may be colored. For this map, the polygon edge is changed to a thicker red line.
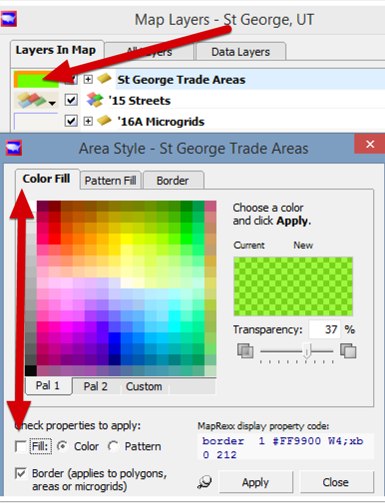
Area style selector: clear "fill" box
Activating the grid layer for "Classify by Value".
In the Map Layers box, double-click the Microgrids layer to make grids the active layer.
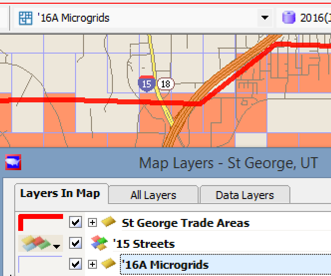
double-click Microgrids to make active
Classify by Value: Objects in checked groups
From the Scan/US Data menu, choose "Classify by Value." When the "Specify objects to classify" dialog appears, choose "Objects in Checked groups" on the right-hand column.
This will make your group named "St. George trade areas" pop up as one of the groups you can check, and when you check it off, you will see "108" underneath "Total objects to group".
108 matches the number of grouped objects you created in the earlier step, so that looks good. Click "Next" to get to the "Specify grouping variable" page.
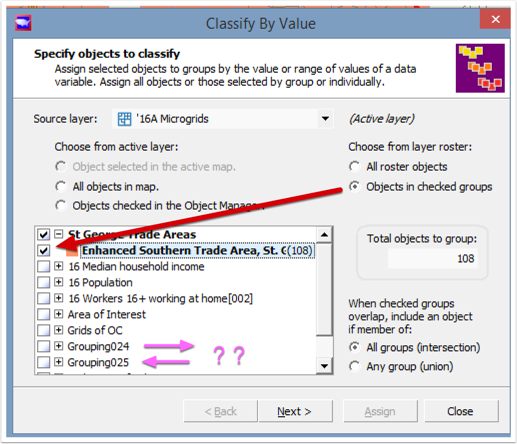
Objects in checked groups, and check your group.
(Note poorly named groups Grouping024 and Grouping025)
Specify Grouping Variable: Households
Under "Specify Grouping Variable" choose the data item you want to see. In this example it is the number of 2016 Households in a grid. Notice the grouping name of "16 Households[001]". The [001] means that this variable has been used before. You should change the name to distinguish it from the other occurrence.
In Strata Manager, get your intervals the way you want to see them in the map, and then, before you click "Assign" back in the other box, rename this new grouping. (A stratification automatically becomes a grouping).
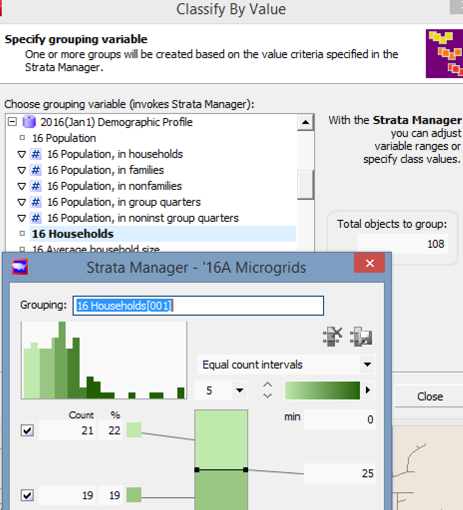
Choose Grouping variable
Name your grouping
This is a great time to rename the new grouping to what you want to see in the legend. If you include the trade area name along with the 2016 Households data item name, it will help distinguish it from other geographic areas, when they appear in menus. You can always rename it later using "Rename grouping..." on the Groups menu.
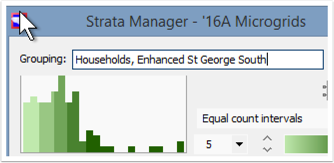
Name your grouping to INCLUDE the trade area name
After you click "Assign", this is your map:
This is your map. It shows exactly what you want to see.
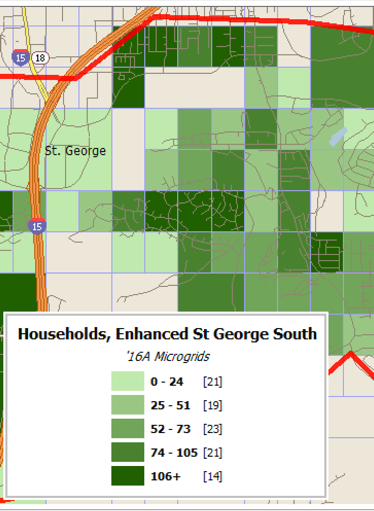
Thematic map of Grids inside your trade area: Your goal!
Rename the grouping
Now, to make sure your map is saved, from the Groups menu, choose "Rename Grouping." This new name will appear in the legend whenever you bring this group into the map.
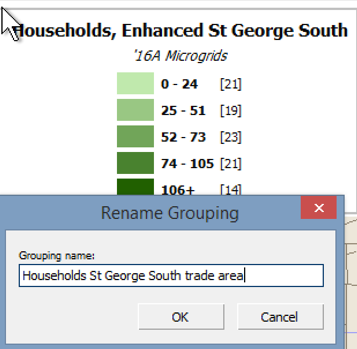
Rename your grouping to bring up Autosave
Rename the grouping, and Autosave
After you click "OK" in the Rename Grouping dialog, the Autosave Grouping dialog will appear. Click OK to save your grouping.
Also, this is a good time to select "Save Study Area" from the Map menu, in case you want to come back to this study area exactly as it is shown.
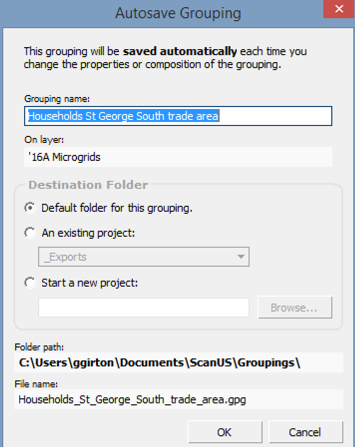
Autosave Grouping (click OK)
Shorthand summary of steps
Here is a shorthand summary of the steps:
A. Group by Object
Select your polygon to make its layer active. It will be the overlay layer
Use "Group by object..." (Groups menu). Microgrids are the target layer.
B. Classify by Value
Make Microgrids the active layer, and do "Classify by Value" (Data menu)
Specify "Objects in checked groups" in the right-hand-column
Specify the variable you want to map.