Working with Excel
There are two main possibilities when importing from Excel into Scan/US:
- import a location file containing latitude/longitude coordinates, and
- attach a data file to the active layer, which is key-matched to geographic areas.
We will show you the basics of each method, sketch some problem scenarios you can avoid, and give you some ideas you can use.
There are many ways you can export data out of Scan/US to use in Excel. The main way is to select "Export data" from the Scan/US Data menu, and follow the instructions to export demographic data; but there are others, and we will cover them too.
- Importing locations vs. attaching key-matched data: differencies and similarities.
- Where to put your data, in the Excel worksheet you want to import.
- Problems you will encounter
- An example study: two files from Tito's Tacos
- Grouping by character-string "codes" that you can place in your Excel file
- Some ideas on how to use Excel
- Exports to Excel
How to import a new locations layer; how to attach data to an existing layer
There are TWO ways to bring data in to Scan/US: "Import Layer", and "Attach Data to active layer."
Import locations. When you have a file that you want to display as locations on a map, import that file using the "Import layer..." command from the "Map" menu. Your file must contain latitude/longitude coordinates for each location. You can also have data for each location on the same row of the Excel sheet that contains the coordinates and the name of the location.
Attach data for areas. When you have a file containing data for existing objects, such as ZIP codes, you can import that file using the "Attach data to active layer.." command from the "Data" menu. Your file must contain just one (1) row for each ZIP code. In other words, if you have two or more rows for a ZIP code, the duplicates will cause a problem.
We will cover both "Import layer..." and "Attach data to active layer...". First, there are some other requirements your file must meet:
Write-able folder
The file must be placed into a write-able folder.
You must have "write/modify/delete" privileges for all folders you bring your data file in from.
That is, you must have full priviliges to write, modify, and delete files in these folders.
Here's the reason:
When you import a file, Scan/US creates two or three "companion files" in the same folder. The files have the same name, but a different extension, such as ".thc", ".dl", and ".kx". We will talk about this later.
The recommended approach is to use "Users/Yourname/documents/ScanUS/userdata", which Windows specifies should be a writable folder. Under almost all circumstances, this folder is writable: you will not need to worry about making the folder writable when you put the files you want to import in this location.
File Format Fundamentals
Upper left cell
Everything starts in A1, also called R1C1, the upper-left cell in the worksheet. No named ranges are required -- or used. Do not start your data further down, or skip blank columns over to the right, and expect everything to work out. Start in A1.
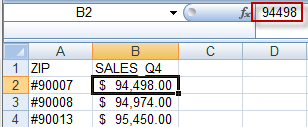
*Start in A1: name of the key: 'ZIP' *
Notice the actual way the number is entered: 94498 WITHOUT dollar signs and commas (red rectangle top right, above). Do NOT type in dollar signs and commas for numbers: use cell formatting to display dollar values instead.
Another thing to notice in the example above: there are two columns. You must have at least two columns. Just one column will not work. When you are loading a location layer, you will need THREE columns, one for the key, and one each for latitude and longitude. This will be shown in Example 2, following soon on this page.
First row: unique column names, no blanks or duplicates
The first row of the input file must contain the column names. Put another way, if you have three columns, A1 must contain the name of the A column, B1 must contain the name of the B column, and C1 must contain the name of the C column. Scan/US stops reading columns when it gets to a blank name in the first row. So, each column must have a name. Not only that, but no two columns can have the same name. If you are having trouble loading your file, this is one of the first things to look at.
Speaking of column names, can the column name be anything at all? No, it cannot! The name must be a text entry, in other words, not a number. If you try to name a column with the number 42, for example, when you try to import, Scan/US will ignore that column and every column afterwards, just as if it were blank.
No blank rows!
Subsequent rows have data for the fields. When Scan/US gets to a blank row -- a blank cell in column A, actually -- Scan/US stops reading your table.
Worksheet number 1 only.
Scan/US only reads the first worksheet. However, you may use formulas in your cells on sheet 1 which refer to other worksheets within the workbook. The values will be fetched into the first worksheet by your formulas. The other sheets will be ignored. Therefore, the second or third worksheet is a very good place to put notes, comments, or otherwise-unwritten assumptions about your model.
Entering numbers
When you enter numbers, type in only numerals. Do not use commas or blank spaces.
Right: 1234 Wrong: 1 234 Wrong: 1,234
Numbers with commas or blanks are treated as TEXT, not numbers.
This means that if your 100-number-tall column has 100 numbers, but just ONE of those numbers has a blank, or a comma in it, Scan/US treats the whole column as TEXT. And if it is text and not numbers, you will not be able to use this data column for thematic map analysis. In other words, you won't be able to color the map on the basis of the numbers. Also, when you make a grouping, the numbers will not be summarized by Scan/US, which thinks they are TEXT.
Entering Keys
Your 'Key field' on the other hand, should NOT be numeric. This most often leads to problems in the case of ZIP codes, especially in the Northeast, where ZIPs begin with zero.
You can guarantee that a ZIP -- or other key -- will be non-numeric by using a formula of the type shown below:

A formula to make ZIP codes non-numeric
This formula, shown above as =TEXT(D2,"\#00000"), will also make your ZIP codes the same length and put in the leading zero, so that the ones that begin with zero don't look "funny".
What Keys are for
The purpose of the key is to be a UNIQUE IDENTIFIER for each row. If you have a file with, for example, two renditions of the same ZIP code, you will have no idea which one is going to be picked up. Such a data file is flawed, and should not be used without resolving the "non-uniqueness" problem. In fact, you will get an error or "data import note" if you do not.
This is true for both types of file: locations and keyed data files.
By convention, the key field is the first one: column A. However, when you load the data file, you can pick any other column as the key. In fact, if you name your key "ZIP", and you are loading to a ZIPcode layer (for example), Scan/US will identify the ZIP field in your Excel file, and suggest it as the Key, no matter what column it's in.
Let's go through an example.
Example 1: Loading a file to ZIPs.
For the best experience, before you choose "Attach data to active layer..." from the Data menu, make sure you are on the layer you are loading to (in this case the ZIP code layer).
You will be loading your file to target layer of ZIP codes.

If ZIPs are not active, select them (green arrow above)
Look underneath the menu bar for the active layer indicator. If it does not show ZIPs, click the dropdown (green arrow above) and choose ZIPs from the list. If ZIPs are not in this list, you can add them to the map by choosing "Map layers.." from the Map menu, and looking for "Postal geography" underneath the "All layers" tab of the Map layers dialog.
Polygons and centroids of the same layer are equivalent and you may load to either: your data will appear on both.
After ZIPs are the current layer, choose "Attach data to active layer..." from the Data menu.
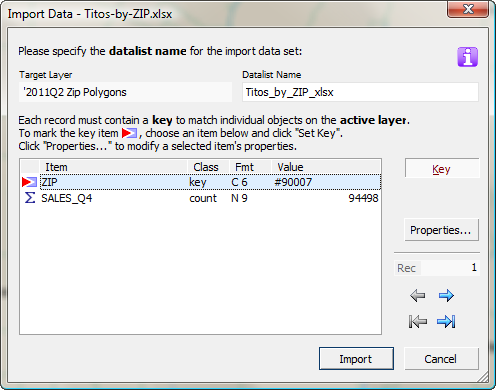
The ZIP column suggests itself to be the key
If the key item (here, above, ZIP) is already marked with the red triangle to the left of it, it is already marked as key, and all you have to do is click Import.
You may, if you wish, change the datalist name, but since the file has a good descriptive name, there is no reason to do so.
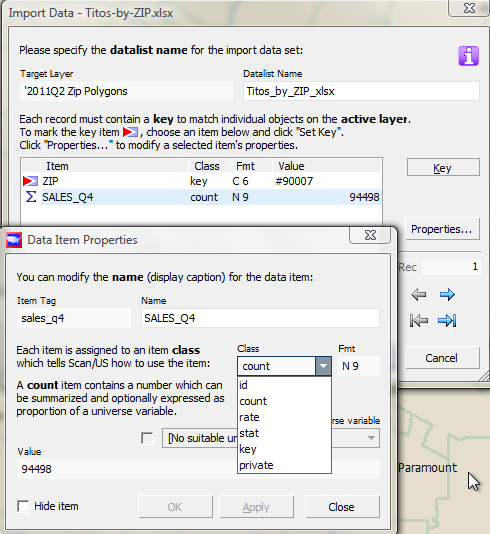
You can choose different properties for each field
The data item corresponds to the data column in Excel.
When you drop down the "Class" picker for the data item, you can see that there are several possibilities, and that the characteristics of the chosen one are shown to the left, as you change the selection.
It is worth making sure your incoming numbers are correctly classified as "count," "rate", or "stat", since that way Scan/US will know whether to add them up, or average them as an average.
Furthermore, when your numbers are a subset of a total, you have an opportunity to specify a "universe variable" within your imported file. That way, you will be able to show percentages within Quicklook, and throughout the system.
Go through the list from top to bottom, and click "Apply" on each data item for which you change properties.
On import into Scan/US, each item is assigned to an item class which tells the program how to use the item: you need to pick one of the class definitions for each item.
Actually, you may not need to pick a definition ... Scan/US tries to figure out what is what, so you only need to change item class assignments that are not correct. Pay special attention to making sure your "count" items have the correct class, because otherwise they will not add up, even though you will still be able to see them for individual objects.
An ID item merely displays the value associated with the item.
A count item contains a number which can be summarized and optionally expressed as a proportion of a universal variable. Scan/US will do this whenever summarization naturally occurs, such as when items are grouped together.
A rate item contains a proportion or percentage of the universe variable you specify.
A stat item contains a number which aggregates into an average, optionally weighted by a universe variable.
A Key item uniquely identifies an object. Records with non-unique or unmatched keys will have a problem being loaded. When you pick a key item, there is another dropdown showing possible types of objects. When importing locations, choose the one called "userobj", and otherwise choose the type of object you are key-matching against.
A private item contains data not suitable for thematic presentation.
When your data item is a character string, you will get a different set of properties, such as a URL web-link, image file, name for labeling purposes, and so forth. These actually work and can be lots of fun, if your imported file has them in it (This one does not). Image files can be .png, .emf, .jpg, .bmp, and .tif.
Ok, now you have imported your file to ZIPs, you didn't get any errors or "Data notes", and everything is great. Except, aside from the new datalist "Titos_by-ZIP-xlsx" underneath the menu bar, you can't see any difference at all in your map!

That's it!? (red rectangle above)
Now that you have the data loaded, you can make a thematic area-fill map based on your data.
Choose "Classify by Value" from the Data menu, choose "All roster objects", then click "Next for the "Specify grouping variable" page.
You will find your imported datalist as the last list:
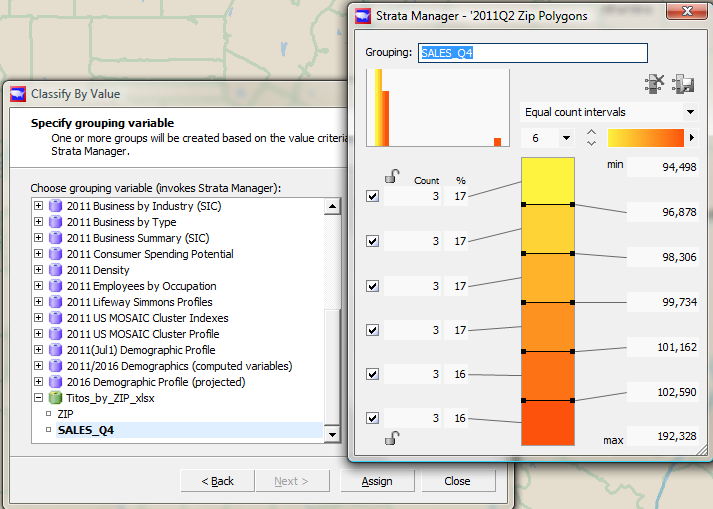
Imported data becomes a new datalist: click "SALES_Q4" (above lower left)
On the "Specify grouping variable" page (above), scroll down until you see the "Titos_byZIP_xlsx" datalist. Click on "SALES_Q4", customize your data ranges when Strata Manager pops up, and click Assign. Notice that you are clicking 'Assign' in the "Classify by Value" rather than the "Strata Manager" dialog, both of which appear.
This is the result -- as you can see, no locations are shown:
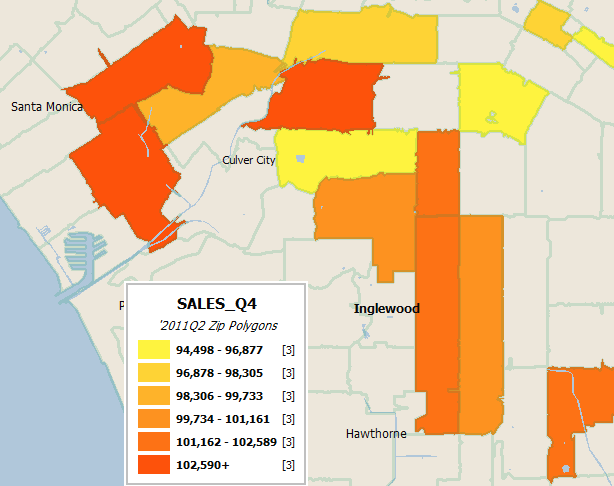
Tito's sales by ZIP in West L.A.
The grouping legend shows the meaning of the colors. You can click on it and drag it around the map, and edit it by right-clicking on it, and choosing "Edit legend.."
Your data has been loaded to ZIPs, and you have used the data to make this thematic map of sales by ZIP code.
Example 2: loading a file containing locations.
In the case of location import, your Excel sheet will look something like this:

Tito's locations
The three columns required are shown in bold, above: a key column, longitude, and latitude. Other columns are optional. Once again, close the file (if open) and proceed.
Since you are importing locations, choose "Import Layer.." from the Map menu. Select the file that you want to load. If you have been looking at the sample file, make sure you close it in Excel first.
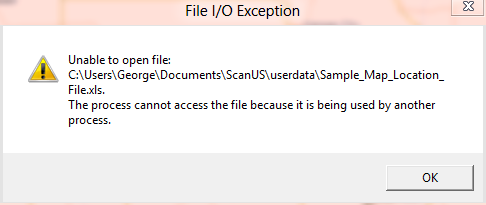
Don't forget to close the Excel file (I forgot)
Oops! Let me tell you, I was 100 percent positive that I closed that file. But then when I looked at Excel after I got this "File I/O Exception" message from Scan/US, there the file was, wide open! If you have not closed it, you may get an error message like this one. We try to protect against these errors, but we don't catch all of them. Don't feel bad about it, just close the file, and try to load the file again. Then you will get the box below:
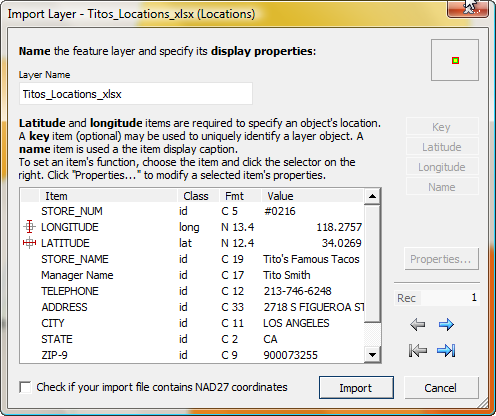
Notice that the Latitude and Longitude 'roles' have been pre-assigned for you.
Notice that the latitude and longitude fields already have little "reticule" icons next to them, indicating that they have been assigned to their correct roles. If the columns had not been named "latitude" and "longitude", it would have been necessary to manually assign them by 1) clicking on the respective fields to highlight them and then 2) clicking the "latitude" and "longitude" buttons (which then would appear as click-able) on the upper right side of the dialog.
You can change the layer name in this dialog, but since we have named the input file with a good descriptive name, we won't edit the name.
However, we will click on the STORE_NUM line to highlight it, and then click the "KEY" button to assign that field as key. Our box will look like this:

To assign the 'Key' role, choose the field that will be key, and click the 'KEY' button
Now the Key role is assigned, as you can see by the red/blue flag next to STORE_NUM. You can click the "Import" button at the bottom, and the points will be imported into your map:
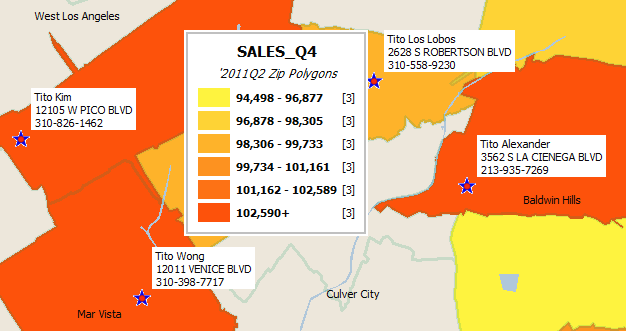
You will be able to see map features (stars, above)
You will be able to see your new locations in the map. It won't look exactly like this. The map above has been customized using two choices on the Tools menu: Symbol Style to choose a star, and the "Content" tab of Label Style to display data values from your file -- manager, phone number, and location -- as labels for each location.
Also, we have used the mouse to drag the group legend into the center of the map, so you can see what the colored ranges mean. Normally you would not put the legend right in the middle of your map.
Here is what your map would look like after an uncustomized import:
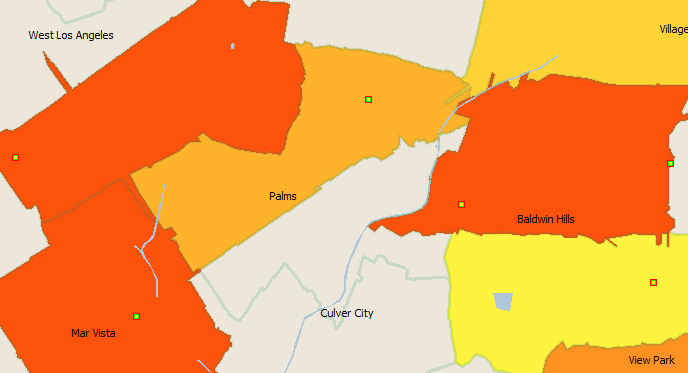
The same map after an 'uncustomized' import
The dialogs below show how to activate three-line labels in your map.
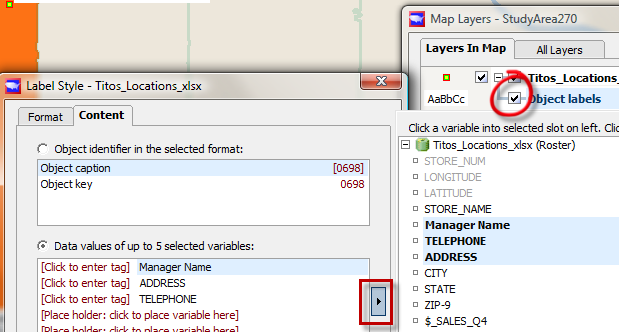
Here is how the three-line labels are done: one line at a time
In the Label Style dialog above, notice that in the "content" tab of "Label Style" (Tools Menu), there is a triangular menu (red rectangle above) which brings up the list of fields to choose as labels. Manager, Telephone, and Address are highlighted in this list.
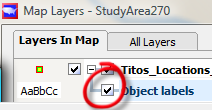
Layer labels must be checked "on"
Also, labels will not appear in the map at all unless you check the checkbox (red circle above) next to "Object labels" next to the Tito's Locations map layer in the "Map Layers" dialog (Map menu).
This session is about Excel, so this "how to" on setting up data labels is short -- but it's a good place to let you know you can do this kind of labeling.
Problems
You may encounter a problem. Here is the meaning of some warning or error messages which may appear. We encourage you to read any error message, and understand what it is trying to tell you. Often the solution to the problem can be found in the error message itself.
Keys did not match objects
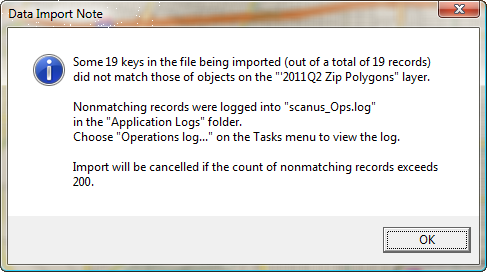
If ALL keys don't match, you may be on the the wrong layer!
This error message popped up because, trying to load to a ZIP layer, the key field for the Z9 was chosen. Notice that when 19 out of 19 don't match, it may mean you are on the wrong layer. Here it means we picked the wrong column as key.
Since ZIP codes change year by year, if you are loading ZIPs to any particular year -- and you always will be -- there is a chance some may not match. That is why Scan/US will still load when up to 10 percent of the file does not match, so you can get on with your work in spite of a minor mismatch. However, if ALL codes don't match, it's a clue to the problem
Notice also, the error message above -- which is actually not referred to as an "error" but as a "data import note" -- directs you to choose "Operations Log" from the Scan/US tasks menu, in order to find out which keys did not find a match on the current layer.
After you have resolved your non-matching keys, you can import again: you may get this message:
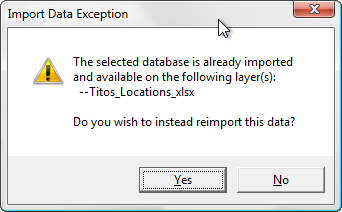
If you have imported already, you can do it again
Choose "Yes," and re-import the data file.
Duplicate keys
There is another aspect to loading key-matched data. You cannot have duplicate keys when you are trying to load locations. If you do, the following message will appear:
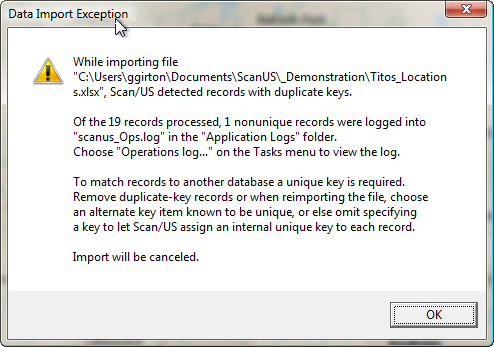
Duplicate records give this message
In other words, if you are trying to attach a data file with ZIP codes in it to the ZIP code map layer, any specific ZIP code can appear only once in that file.
Notice that once again you are directed to choose "Operations Log" from the Scan/US tasks menu, in order to find out which keys are duplicated.
The operations log file also provides a record of duplicate keys:

The logfile shows which ZIP code is non-unique
Notice that it tells you EXACTLY which line -- line 5 -- and which code -- 90016 -- is causing the problem. This is something you can easily fix.
If you have a very large number of non-matching keys, you may wish to copy the logfile directly, and work from it as you resolve the conflicts. In fact, if you received the Excel file from someone else, you may need to give them a record of the log file, so they can resolve the duplicates in the workflow before it gets to you. You will not be able to access this file while Scan/US is open, but after you close Scan/US you will find it in this folder: "users/yourname/documents/scanus/Application Logs/ScanOps.log"
Other problems
Problem: If a file is open in Excel when you try to load it, it will not load.
Solution: Close the file in Excel, and repeat the procedure.
Problem: If you RE-open the file in Scan/US after loading it into Scan/US, Excel WILL open it, BUT if you should happen to try exporting that data from Scan/US, or perhaps looking at the data with Scan/US QuickLook, Scan/US will crash.
If still you have that file open when you try to re-start Scan/US, it will say "Unable to open file. The process cannot access the file because it is being used by another process." Getting this message after you have crashed is an indication of why you crashed.
Solution: Close the file in Excel, and restart Scan/US.
Problem: Scan/US "blows up" when you are trying to import a file. Not only that, but you can't seem to restart!
Solution 1: In the folder you imported from, delete new files with today's date and the current time (roughly the time of import) which have the same name as your 'non-imported' file (that is, the one you just tried to import), but a different extension, such as ".thc", ".dl", and ".kx". You don't have to delete your original file -- You will want to examine it in order to find out why it "blew". Chances are, getting rid of the temporaries will let Scan/US start again.
Solution 2: The first time Scan/US starts, it creates a folder called "ScanUS" in users/your-username/documents/ScanUS. This contains all saved groups, study areas, loaded files, and so forth. If you don't have any such saved files, you can simply rename "ScanUS" to "ScanUS-1-old", and attempt to restart. Scan/US will restart under these circumstances.
Tito!
The famous Tito's Tacos spreadsheet. You may find this in the folder these help files are found in, and move it to a folder where it will be in a writable directory. Typically this will be in "users/username/documents/scanUS/userdata"
Groups and Excel
Group management
When you create a group, either manually or using "Classify by Value" on the data menu, Scan/US makes a datalist called "Group Assignments". The group assignments are saved when you save the group from the Groups menu, but you can also export these group assignments out of Scan/US using "Export Data" on the data menu.
Then, you can read the assignments back, and re-assign them using "Classify by value". In this way, although it is more convenient to manage groups inside Scan/US, you can externalize your group management outside of the Scan/US software.
Assigning large numbers of groups
Let us say you have an Excel sheet where you have coded each object with an alphanumeric key. Up to 4000 groups can be assigned in Classify by Value. You load the sheet to your geographic objects, and use Classify by Value (Data menu) to make a thematic map.
Excel ideas
Write it out, combine variables, read it back in.
One thing Excel is excellent for is to write out demographic variables, array variables such as age ranges or ranges of household counts by household income, combine them using an Excel formula, and read the resulting worksheet back in.
For example, suppose your target demographic is households earning more than $100,000 per year. You would select "Export data" from the data menu, and export the following five data variables for all objects of interest: ZIPs, Block groups, Microgrids, or whatever.
- 2012 Households, income 100T-124.9T
- 2012 Households, income 125T-149.9T
- 2012 Households, income 150T-199.9T
- 2012 Households, income 200T-249.9T
- 2012 Households, income 250T+
Then, you would use an Excel formula combine the varibles in a new data column, e.g. "=B2+C2+D2+E2+F2", and double-click in the lower right-hand corner of that cell to propagate the formula down through your sheet. Then, using the techniques described above, load the data back in to Scan/US, and make your thematic map using the total.
Export Distance
You can export, to an Excel sheet, distances between locations on one layer, and locations on another layer. This is done using "Export Distance" from the Objects menu: an example is shown in the help page on Multiple-object reports.
It should be possible to construct fairly sophisticated gravity models using a combination of exported distance, and exported demographic data items from the MicroGrid level, and read it back in to plot the zones of commercial attraction.
Bonus tip: filename extensions
How to make sure you can see filename extensions ".bak", ".ini", ".xls", etc.
Open "Computer", and from the Tools menu, choose "Folder Options". You will see three tabs: General, "View", and "Search"
On the "View" tab:
Un-check the checkbox next to "Hide extensions for known file types".
Click Apply (at the bottom), and then click "Apply to Folders" (up at the top).
Now you will be able to tell the difference between "scanus.ini" and "scanus.bak". Convenient!
Recommended reading
If you need to work with Excel, and you haven't worked much with it, Matthew MacDonald's book contains a wealth of shortcuts, caveats, and simple explanations. It can reduce your frustration level significantly, and make you more effective with Excel -- and with Scan/US. Because it is an older version of the missing manual, it most likely won't be missing from your local public library shelves.
MacDonald, Matthew. Excel 2007 for starters : the Missing Manual